
When a surface needs a little help, you can bring in an electric sander and let it do the hard part. It smooths raised spots, softens rough grain, and gets wood ready for stain or paint with far less strain on your hands. The trick is matching the right sander, grit, and pressure to the job, because one wrong pass can leave more fuss than fix.
What Do Electric Sanders Do?
Electric sanders save you time and spare your hands from a lot of hard rubbing, because they use powered motion to smooth wood, strip old finishes, and shape rough spots fast. You can count on them whenever you want cleaner results and less strain.
In surface leveling basics, they help you bring high and low spots closer together, so your project feels steady and ready for the next step.
Their sanding tool mechanics matter too, because the pad or belt moves in a set pattern while you guide it. That motion lets you work with control instead of forcing every pass.
Whether you’re fixing a shelf or revitalizing furniture, you’re part of a group that likes smart tools and solid results.
How Sanding Smooths a Surface
As you sand a surface, you’re not just rubbing away roughness, because you’re also leveling tiny highs and lows that catch light and feel uneven under your hand. You join a simple process that makes the work feel calmer and more welcoming. Friction abrasion wears down raised spots initially, so the surface starts to match itself better. Then the finish becomes easier to see and touch.
- You cut the peaks.
- You soften the scratches.
- You blend the edges.
- You reveal an even face.
As you keep going, surface leveling helps the whole area look steady instead of patchy. That’s why each pass matters. You’re not forcing the material to change; you’re guiding it toward smoothness with patience and control. The result feels more finished, and you can trust your hands again.
Types of Electric Sanders for Smoothing
Choosing the right sander can feel like picking the right brush for a careful paint job, because each one handles roughness in its own way. You can use a sheet sander for light smoothing on flat boards, while a detail sander helps you reach corners and sanding edge profiles without fuss.
A random orbital sander moves in mixed circles, so it leaves fewer marks and feels friendly for general smoothing. Should you need quick stock removal, a belt sander works fast, though you must stay gentle. For tighter jobs, compact finishing tools fit your hand and keep control high. In-line sanders glide back and forth with the grain, which helps you keep surfaces calm, even, and ready for the next step.
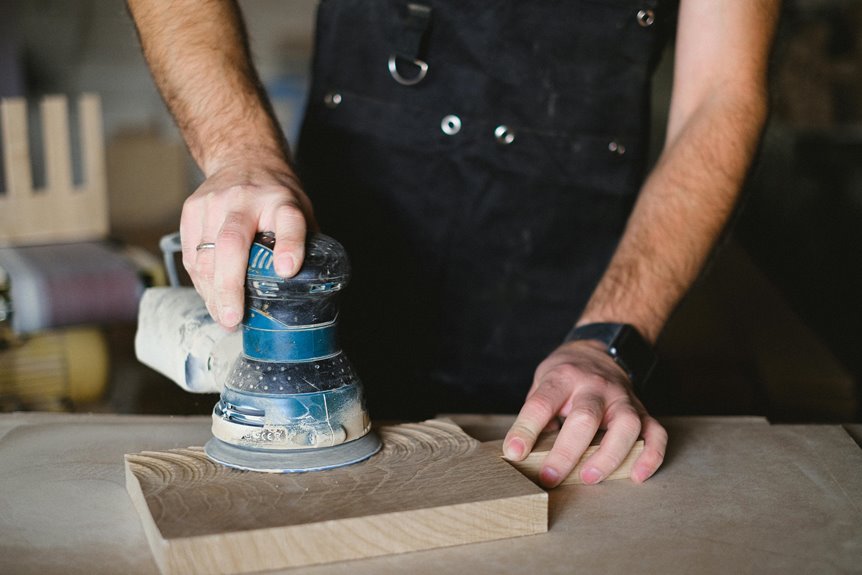
Best Uses for Orbital Sanders
Orbital sanders shine brightest in the hand-finishing stages, especially whenever you want a surface that feels smooth without leaving harsh marks. You’ll fit in fast whenever you use one for finish sanding after rough shaping. It helps you blend edges, level light scratches, and prep wood for stain or paint with calm confidence. For the best results, keep your moves easy and let the tool do the work.
- Use it on flat panels.
- Smooth trim before coating.
- Refine patches after filler dries.
- Focus on swirl minimization.
Because the pad moves in a small circle, you can clean up details without fighting deep grooves. Whenever you’re aiming for a neat, friendly-looking finish, this tool makes the process feel less lonely and more doable.
Best Uses for Random Orbital Sanders
When you need to strip old paint, a random orbital sander can help you clear the surface without leaving harsh scratch marks.
It’s also a smart choice for fine surface prep, since its swirling motion smooths wood and helps you get ready for the next coat.
You’ll get the best results when you keep the pad flat and let the tool do the work.
Paint Removal
Should you need to strip old paint without ruining the surface underneath, a random orbital sander can be a real time-saver. You can lean on it whenever paint stripping methods need control, not brute force. It helps you stay steady, and that makes the work feel less like a battle and more like progress.
- Start with coarse grit for the initial pass.
- Let the pad glide, and don’t press hard.
- Check edges often, since they wear faster.
- Use rust removal prep on metal spots before you move on.
This tool works well on wood and metal, especially whenever you want to keep your project in the family of good-looking fixes. Because it moves in mixed circles, it leaves fewer marks, so you can keep going with confidence and calm.
Fine Surface Prep
Because fine prep decides how your finish will look, a random orbital sander can save you from a lot of frustration later.
You fit fresh paper, then make a careful surface inspection for scratches, dents, and tear-out. From there, you move in light passes and let the pad do the work, so you don’t press in ugly marks. Keep the tool flat, overlap each path, and vacuum dust between grits. That simple habit helps you stay in control and feel like part of a crew that cares about clean results. As you step from 120 to 180 grit, the wood turns smoother and more even.
Then your final finish lands better, with fewer swirls and a calmer look that feels earned.
Best Uses for Belt Sanders
A belt sander is your best friend whenever you need to remove a lot of material fast, especially on rough lumber, uneven boards, or old finishes that need to disappear in a hurry. You can lean on it for floor leveling, rough shaping, and fixing proud edges before finer sanding takes over. To keep control, you should:
- Start with coarse grit.
- Keep the sander moving.
- Follow the grain.
- Check your progress often.
That quick, steady approach helps you stay in the groove with the job, not fight it. It also makes big flaws feel less intimidating, because you’re taking them down in clear steps.
Whenever you use firm but gentle pressure, the tool does the heavy lifting, and you keep the surface honest without turning it into a mess.
Best Uses for Detail Sanders
Whenever you need to reach the places bigger sanders just can’t touch, a detail sander becomes the tool that saves the day. You can trust it for tight corners, edges, and narrow spots around cabinets or frames. It also helps you clean up intricate trim without bruising nearby surfaces. When you guide it gently, you stay in control and keep the work neat.
You’ll like how it fits into small projects, repairs, and finish work where a larger tool feels clumsy. Whenever you’re restoring furniture, doors, or molding, this sander lets you match the shape instead of fighting it. That means less frustration and a smoother path to a polished look. You’re not working alone here; you’re working with a tool made for the awkward places.
How to Choose the Right Sandpaper Grit
Choosing the right sandpaper grit starts with understanding what you need the surface to do, since rough grits strip and shape while finer grits smooth and prep for finish.
You’ll want to match the grit to the material and the condition of the wood, because a rough board needs a different start than a lightly scratched panel.
Then you can move through the grit steps in order, so each pass makes the surface cleaner, flatter, and easier to finish.
Grit Basics
Sandpaper grit is the quiet decision that makes a big difference, because the right grit can save you time, protect your surface, and keep your project from turning into a frustrating mess.
You’re not guessing here; you’re checking the surface first, then making grit selection feel easier and safer.
- Start with rough flaws, not fear.
- Use medium grit if you need to smooth scratches.
- Move finer only after the marks look even.
- Keep fresh paper handy so you don’t fight dull edges.
Whenever you match the grit to the job, you join the crowd of makers who work cleaner and finish stronger. A little patience now helps your sander glide instead of dig. That means less stress, fewer do-overs, and a surface that feels ready for the next step.
Project Surface Match
Now that you know how grit affects the finish, the next step is matching that grit to the surface in front of you. You’re not guessing; you’re making smart project surface matching choices that fit the job and your comfort level. Soft pine needs a gentler touch than hardwood, and painted or rusted spots ask for different care. Before you start, do material compatibility checks so the paper won’t clog, burn, or scratch too hard.
| Surface | Best Grit | Check |
|---|---|---|
| Pine | 80 | Soft fibers |
| Oak | 100 | Grain lift |
| Paint | 80 | Coating type |
| Metal | 80 | Rust level |
If the surface feels uneven, choose paper that clears the flaws without fighting the material. That’s how you stay in the same crew as a clean finish.
Progressive Grit Steps
A smart grit plan starts with the surface in front of you, and that initial choice can save you a lot of backtracking later. You’re not guessing here; you’re guiding the finish. Begin with the roughest grit that clears damage, then move up in small steps.
- Start 60 to 80 grit on rough lumber.
- Shift to 100 or 120 grit after flattening.
- Use 150 grit to erase earlier marks.
- Finish with 180 grit for smooth, even results.
Your grit progression strategy works best when you vacuum dust between passes and check pencil lines. Those sanding checkpoint methods show you where the surface still needs help. Whenever the wood feels ready before the next grit, trust that signal and keep your rhythm. You’ll get a cleaner finish, and your sander crew will feel right at home with you.
How to Match the Sander to the Material
Matching the right sander to the material starts with grasping how much force the surface can handle and how much shaping you really need.
You’ll feel more confident once you check material compatibility initially.
For soft pine, choose a lighter random orbital or sheet sander so you don’t dig in.
For hardwood, use your wood density choices to decide whether a belt sander is too aggressive or whether a slower orbital feels right.
Should you be working near edges or tight corners, a detail sander fits better and keeps you in control.
For rough stock, start strong, then switch to a gentler tool as the surface levels out.
That way, you work with the material, not against it, and your finish starts off on the right foot.
Set Up Dust Collection and Safety Gear
Before you start sanding, you should set up dust collection so fine particles don’t spread across your work area or clog your tool.
You’ll also want to wear safety gear like eye protection, hearing protection, and a dust mask or respirator, since sanding can kick up more dust than you expect.
With those basics in place, you can work more safely and keep the job cleaner from the initial pass.
Dust Collection Setup
How do you keep sanding dust from taking over your shop? Start with a dust control setup that matches your sander and your space. When you connect the hose well, you save cleanup time and keep the air clearer for everyone working beside you. Try these vacuum hookup tips:
- Match the hose size to the port.
- Seal loose joints with tape or adapters.
- Keep the vacuum close to the tool.
- Empty the canister before it clogs.
Next, check the airflow as you sand. Should dust trails behind, tighten the connection and slow your pace. You’ll work cleaner, breathe easier, and feel more at home in your shop.
That little bit of order makes the whole sanding job smoother, and honestly, your floor will thank you too.
Safety Gear Essentials
Sanding can kick up more than just a little mess, so once your dust collection is set, it’s time to protect yourself too.
Put on eye protection before you switch on the sander, because tiny grit can fly fast and sting hard. Add hearing protection next, since long sanding sessions can wear you down even if the tool feels easy to handle. A snug dust mask or respirator helps you breathe cleaner air, especially while you work in a closed space.
Wear fitted clothes, tie back long hair, and skip loose jewelry so nothing catches. Comfortable gloves can help with grip, but keep your fingers clear of moving parts.
When you gear up this way, you join the crew that sands smarter and stays ready for the next smooth pass.
Avoid Over-Sanding and Uneven Pressure
Even while you’re keen to get a smooth finish, you need to hold back a little and let the tool do its job. You and your crew can stay in sync using even pressure techniques and avoiding sanding mistakes. When you lean too hard on one edge, you’ll dig a dip and make extra work.
- Keep both hands steady and let the pad sit flat.
- Move at a calm pace so the grit can cut evenly.
- Check your passes often, especially on edges and corners.
- Shift your body, not your wrist, to spread force.
When you feel the sander tug, ease up and guide it lightly. That small change keeps the surface true and helps you belong in the group of careful finishers.
Frequently Asked Questions
How Often Should Sandpaper Be Replaced During a Project?
Replace sandpaper the moment the abrasive no longer cuts cleanly, the sheet fills with dust, or it starts marking the surface with scratches. Inspect it frequently and change it at the first sign of slower sanding or poor dust removal so the finish stays even.
Can Electric Sanders Be Used on Painted Surfaces?
Yes, electric sanders can be used on painted surfaces. They help remove loose paint and smooth the surface for better adhesion. Use dust control to keep the area clean and reduce mess.
What Causes Swirl Marks After Sanding?
Swirl marks form when the sanding pad is angled, pressure is too heavy, or the grit sequence is skipped, which throws off grain control and sanding consistency. Keep the pad flat and use steady movement for a smoother finish.
Is Wet Sanding Better Than Dry Sanding?
Yes, wet sanding can deliver a smoother, silkier finish when that is the goal. It also reduces dust and helps limit scratches, which can improve the final surface and give the work a more refined look.
How Do Robotic Sanders Improve Finishing Quality?
Robotic sanders create smoother finishes by applying controlled pressure with exact repeatability, which reduces uneven spots, scratches, and gouges. Their steady performance helps every section meet the same finish standard.